Thursday, December 18, 2014

Christmas Gifts c/o Formosa Covers

Already feeling the cool breeze of December? That means Christmastime is just around the corner. And if you’re still fretting about what’s the best gift to hand over this Yuletide season for everyone, Formosa Covers will “cover” all your holiday gift needs, because that’s what we do best!

And to specify, we give you some items that we thought would be the perfect gift for each family member! Ready to gift wrappers, ribbon, scissors and adhesives!

For Dad: Vehicle Cover
Car aficionado? Or perhaps, golf enthusiast? Maybe, watersports guru? Whatever the case may be, dad can surely use a reliable vehicle cover to protect and maintain some of his leisure investments, such as sports car, golf cart, bike, ATV or snowmobile. He’ll thank your for it!

For Mom: Patio Umbrella


Because mommy likes to chill out and relax by the patio after a long day of garden sprucing and patio decorating, a brand new patio umbrella will be the perfect gift for her, so that she can easily lounge to a laid back afternoon with matching pitcher of lemonade and a garden music on the side!

For Sassy-Savvy Sister: Mobile Phone Cover


Aww, your ever busy sister, always fumbling her precious smartphone. Thank heavens for these smartphone protective cases, your sister doesn’t have to worry about another dent on her phone! And did we mention how neutral yet stylish and sleek these cases are? This is going to complement your sister’s everyday fashion statement.

For Outdoorsy Brother: Sleeping Bag


Since your brother likes to go out camping, hiking, or the occasional sleep over with friends’ cabin, why not give him the gift of comfort in the form of sleeping bag? This snuggly present the ideal present if you have a sleepyhead sibling in the house as well.

For your pet, Buster: Pet Throw


And because you don’t want your pets to feel left out this Christmas, we’ve got something in-store for your furry house fixture as well. Since winter season is slowly breezing its way through, let your pet feel the warmth by giving him a nice, comfy pet throw.

We told you, we’ve got everything you need to complete your Christmas presents. Now, you can pretty much enjoy the rest of the holidays!

Wednesday, December 10, 2014

Winter Wonder-ride: Is Your Car Winter-Ready?

Cars in general are there to provide convenience in getting us from point A to point B. However, it seems that it’s not merely the case during winter season. And for some, this convenience can easily turn into sheer disaster, as their cars usually experience the worst case of winter-related car breakdowns.


In most cases, drivers and motorists tend to take car winterization for granted. That’s why bad riding experience happens. To be able for you to maintain not only the performance of your whip, but also to retain its handsome looks for the upcoming winter season, here are some useful “to-dos”:

Tune Up

This includes checking the oil’s viscosity and condition. If the oil’s color has gone from bright amber (red, orange or green for some) to dark brown/black, that’s your indication that you should drain your motor oil. In addition, as part of the tune up, inspect the spark plugs, timing belts, braking system, and tubes. If you see leaks and other damages, it is highly recommended to call a mechanic for immediate repair.

Inspect your Tire’s Condition

One major factor of winter-related accidents is worn or wrong set of tires. Tires have different specifications in terms of use. Using the wrong set of tires during winter may compromise the car’s handling and braking. More so, worn out tires could do much worse, so make sure to install the right tires, especially for this slippery-icy season. Moreover, 4WDs have this specific function to improve traction, handling and overall driving performance during harsh conditions.

Check and Put Ample Amount of Antifreeze to your Radiator

In most cases of engine breakdowns are radiator-related causes. This is either due to overheating or too cold to function. This is where antifreeze comes in handy. Antifreeze or radiator coolant serves as your engine’s thermostat. It keeps the water to stay fluid from your radiator during cold season, while maintaining its “cool” when operating at high temperatures during summer. To ensure efficiency, make sure to mix 50% of antifreeze and the other 50% is clean distilled water.

Battery Charge

Winter season is notorious for killing off battery’s power, so it’s better to check its charge religiously and inspect the terminals for possible corrosion. In relation to this, when starting a car during cold season (especially for diesel-powered vehicles), it is best to let the engine warm up a bit to be able for the battery to recharge. If the installed battery is 3 or 4 years max, replacement is in dire need. And as an assurance, keep a set of jump cable and a charging pack in your back compartment in case you need a quick jumpstart.

Apply Wax/Winter Sealant to your Car’s Body

Cosmetics-wise, your car’s number one enemy is road salt (sodium chloride + magnesium chloride), while the actual snow is just number two. This de-snowing method may be helpful in de-icing roadways, but it is also infamous for degrading your car’s paint and underbody. As a solution, make it a point to wash your vehicle regularly with soapy warm water, then dry. If you happen to own a power washer, this will be useful in flushing off salt residue and buildup underneath the car’s body/chassis. Next is to apply wax and/or winter sealant to maintain its glossy look.

Make some Room for Your Car in the Garage

And during this coming winter, using your garage as an “actual” car garage will be a big help in maintaining the mint condition of your ride. As an added protection, cloak it with your trusty car cover to shield it against dust, excess water, snow and other particles that may degrade your handsome heap’s overall cosmetics.

Got any other “cool” ideas on how to winterize your car? Let’s discuss by leaving a comment below!

Wednesday, December 3, 2014

Make Your Home Winter-Ready for the Cold Season

In the lane, snow is glistening… And it’s going to be more evident by the time snowflakes start to fall. Depending on your area, cold season is a great dilemma. For one thing, you have to re-organize almost the entire house just to be ready for the temperature drop.


So much for building a snowman, it is a-must that you should winterize your home above all, to uphold convenience even in the midst of the gloomy and oftentimes harsh weather.

Here are some quick, useful and easy steps on winterizing your humble abode this cold season:

Garage and Driveway

Garage is basically the frontliner of your house, so it is understandable and pretty basic to winterize this part of the house first. First thing to do is to check the working condition of the garage door. That includes quick repair for minor dents, holes and seal gaps. Next is to ensure your tools are well-stored, complete with silica gel to prevent rusting. Snow salt is notorious for its power to give the worst case of rusting, so better keep your tools and garage equipment safe. In addition, lube up door hinges and brackets by applying grease or oil on it to.

As for the driveway, keep a trusty shovel or ice blower in handy to blow off snow accumulation. Moreover, if pavements and concrete surface have cracks, make sure to fix it weeks before the start of the season. Lastly, clear off your roof and gutter from leaves and other debris that may and can block off snow and water buildup.

Above all, keep in mind to ready your trusty vehicle cover to protect your ride from the harsh snow-and-salt as well.

Inside the House

Homeowners tend to take this task for granted, but believe us when we say that doing this detailed task will benefit you in terms of saving money for far more extensive after-winter repairs and pest controls. Initially, keep your house a bit warmer by installing additional insulations. Next is to check the walls and ceilings for leaks. Snow can be nasty, especially when it melts away and seeps through small gaps of the house.

And speaking of leaks, might as well check your pipeworks for cracks and leaks. It is during this time that most pipes –especially the metal ones – are prone and vulnerable to breakage and rusting. And while you’re at it, you might want to extend an extra effort of adding extra protection to your pipes by wrapping them up with heating tapes.

Additionally, make sure to close all shafts and windows in the basement and attic to prevent insects and other animals to invade your warm space.

Patio/Backyard

Another vulnerable part of the house, you might say. Although, much simpler to winterize this part of the house. All it takes is to give it a nice, efficient sweeping. Next step is to blanket your cozy furniture and fixtures with heavy-duty furniture covers, including the patio umbrella, barbecue grill and air conditioning system.

Chimney and Fireplace

Finally, this is also the perfect time to gather wood fuel and brush off backyard debris to your fire pit, fireplace and chimney for the cold season. But before sparking a match on it, it is vital to inspect your fireplace and/or chimney for excess creosote deposits and other fire hazards that could impose accidents. It’s quite obvious you will be using this quite a lot for the next coming months, so it is recommended to go through with this preventive maintenance to avoid unwanted winter disasters.

Wednesday, November 26, 2014

Setting Up a Warm, Cozy Lounge Spot for Your Pet for the Cold Season

Just like us, humans, cats and dogs are also vulnerable to extreme cold, especially during winter season. And it is fair and just that you should give them a nice, warm spot to take refuge as the cool breeze lingers on.
Forget about taking your pets outside. And don’t even think about leaving them out in the cold. To tell you the truth, that’s not “COOL”! (Pun intended)

Better yet, go and set up a sweet spot that’s warm enough to accommodate your furry little friends this frosty season. Here are some easy tips and steps:

Prepare your pet’s indoor sanctuary


First thing to do is to prepare the necessary stuff to use in setting up a temporary shelter for your pet. This includes a pet basket furnished with a pet throw or an old quilt, toys, feeding dishes and drinking bowl. If you happen to have an outside shelter for your pet, you might also want to spruce it up in case your 4-legged companions prefer to stay outdoors for a while after a nice, short cold walk. Install proper insulation if needed. In addition, be mindful that it is still best to let your pets slack off in your humble abode for a few weeks or so – or at least until the ice melts – to keep them warm.

Spot near by the fireplace, in the garage or in the basement

Make sure to set up the “pet lounge” in an area where warmth is adequate to keep them cozy and snug. Moreover, the garage can also be a perfect spot for your dog/cat to spend the entire winter, provided that their lounge should have a safe distance away from any vehicular or tool hazards.

As for using the basement, it is suggested that before pimping your underground space, you must ensure that there’s a pet flap installed onto the door to prevent incidents of pets getting trapped downstairs.

Get them pet sweaters and jackets

Because their own fur, and even when cloaked with their favorite pet cover, is still not enough to block off the intense cold. Besides, it seems that most pet owners nowadays are fond of dressing up their k-9s and feline friends. So, might as well put something functional on them to maintain and regulate their body temperature. Additionally, it is better for your pets to wear booties to protect their paws from snow and salt when taking a walk.

Keep the drapes open during daytime

Get the most out of the daytime by keeping the drapes and window curtains open, especially when there’s enough sunlight to fight off frigid winter gust. For most house pets, it is quite automatic for them to follow the sun’s path by the window, so it is also advised to set up your pet’s lounge anywhere near glassed hole.

Finally, make sure to always keep an eye on your cuddly pets, as they tend to become uneasy, especially if it’s their first time to stay indoors for a stretched amount of time. Check their temperature regularly and yes, an occasional belly rub helps a lot in giving your pets comfort.

Tuesday, November 18, 2014

Time to Tune-Up Your Snowmobile!

Cold season is here! No wonder quite a number of people have been too busy caving into their own backyard parking and garages getting their winter beast all warmed up and ready for the ice build up… Err, snowmobile, that is.

But hold your tauntauns for a sec! Just before taking of the snowmobile cover and kickstarting the good ol’ winter warrior, you must see to it that everything is all prepped and checked. Remember, your snow vehicle just woke up from a long hibernation so relatively, your “sled” still in the state of “atrophy”. Doing otherwise will only cause you some unexpected engine troubles that eventually lead to an avalanche of expenses.

Is your snowmobile ready to hit the cold?


To save yourself the hassles and embarrassments while giving you a solid snow-riding experience, here are some tips on tuning up your snowmobile for the season!

Rely on your user’s manual

Before checking up on any part of your snowmobile, it is highly advisable to rely on your user’s manual for tune up instructions and steps. This will apply greatly to those rookie riders. This is to avoid unnecessary alterations and tweaking that may cause serious damage to your snowmobile overtime. It is also fine to call a serviceman to facilitate the tune-up in case you’re not yet familiar with the parts of the sled.

All lubed up

Ensure the oil level of the snowmobile if it’s still sitting on the right level. In addition, you may also want to inspect the viscosity and the color of the oil if it is still applicable for use. If the oil filter needs to be replaced, then please do so. Same goes with the oil pump, as these components maintains the integrity of the oil and distributes it to the engine’s most part for lubrication, respectively.

Tank and carb clean

And since you’ve stockpile your sled for nearly a year, it is also a-must to check and replace the gas inside the tank. Gas tends to accumulate varnish and other chemical residue that can and will block of your carburetor’s jets. Speaking of which, this also goes with maintaining your snowmobile’s carburetor. A clean tank and carburetor not only will give you a smooth ride, it will also promote the fuel efficiency of your ride.

Keep it cool

Just because it’s snowing, it doesn’t mean your snowmobile’s engine will be invulnerable to overheating. That’s why it is still advisable to add coolant to engine’s radiator. If it requires water as well, then don’t think twice about pouring some on it.

Chain, chain, chain!

Aside from checking the chain case’s oil level, you must ensure its calibration if it has the right tension, wear as well as the condition of the components that go with it. This also goes well with the track and belts.

Full charge

Battery, that is. As said earlier, your ride has been out for a long season of hibernation. This equates to idled battery, which can be discharged even when not in use. Especially when connected to the vehicle even when not in use. It is best to check the charge level of the battery.

Spark of connection

Spark plugs are essential for delivering electric current to produce electric current to ignite the fuel, which is responsible for producing power to your snowmobile. That’s why practically all mechanics always recommend to change spark plugs every once in a while. As for usage in snowmobiles, it is advisable to change every season of usage.

Brakes and lightings

Last but not the least, and probably the most important thing to inspect are the functions and condition of the brakes and lightings. Like other vehicles, these integral parts and elements should be well-maintained to ensure safety and to further prevent vehicle-related accidents.

Once you’ve checked all of these, you’re now ready to mount and hit the snow!
Snowmobile Trailerable Storage Cover by Formosa Covers

Moreover, visit Formosa Covers’ official website to check out our line of vehicle covers including for snowmobiles!

Tuesday, November 11, 2014

Patio Umbrella Maintenance This Cold Season

Patio umbrellas are there to keep us refreshed and protected from the sun’s UV rays and scourching heat as you chill by the backyard. On the other hand, rain, snow and cold season is a different story altogether. And since it’s starting to feel a bit chilly, looks like you won’t be needing much of a shade anytime soon.

Protect your patio furniture investments with Formosa Covers
And since your umbrella will be on a season-long hibernation inside its umbrella cover, you may want to clean up as well before closing it and zipping it off until spring comes. So, to help you prep up your umbrella before sending it off to a long vacay, here are some maintenance pointers:

Wipe ‘N Wash

Outdoor umbrellas are obviously vulnerable to practically all kinds of dirt. And this includes dust particles, eroded earth, leaves, tree sap, fruit nectars, bird droppings and insect leavings. This accumulation of nasty stuff may and can leave unwanted damage to your umbrella if left overtime. To avoid this, the first thing you need to do is to wipe off the frame of the umbrella – including the ribs and finial – using a smooth cloth. Never use towel or any rough, abrasive cloth for cleaning, as it may leave noticeable scratches. Regardless if the frame is made of aluminum or wood, make sure to place it on a rubber matting when laying it down on your garage driveway to prevent any unwanted scratches when dusting.

Easy on the soap and chemicals

On a normal basis, cleaning patio umbrellas can be done using water, alone, although in some cases, the need to use soaps, cleansers and other chemical-based cleaning agents is required to effectively wash off hardened dirt patches and stains coming from sap and droppings. These cleansers may do damage to your umbrella such as discoloration, detergent staining and tarnishing. For detachable covers, if you wish to use machine washers (industrial grade laundry-mats), you may do so, provided that you’ll use mild soap. In relation, when using these cleaning agents, make sure to thoroughly rinse the umbrella’s frame, then wipe it dry using a soft cloth. As for the fabric covers, it is advisable to leave it for a while to drying it out completely.

Everyday is not always a sunny day

As said earlier, patio umbrellas are not built to withstand rain and other harsh conditions. Come bad weather or snow/cold season, it is recommended to store the umbrella in upright position for the time being. Also, when safekeeping, make sure that the umbrella is in “DEADLOCK” to prevent it from opening accidentally.

Finally, once your patio umbrella is all prepped up, encase it in a resilient umbrella cover to shield it off from insects, pests and dirt accumulation.

And what better way to do it than to protect your investment using Formosa Covers Patio Umbrella Covers, right? Visit the official site to check out wide range of furniture, car and pet seat covers.

Monday, November 10, 2014

Why The Need to Cover Your Air Conditioning System

There has been a long clash of expertise between seasoned air conditioning maintenance specialists, as to whether or not you should cover our air conditioning system’s outside unit, especially during the cold season. Some say YES because it protects the condenser from elements and dirt particles, while others say NO because it will accumulate moisture from the inside.


So to answer this once and for all, here are some key points to consider and the proper way to cover your air conditioning unit:

Air conditioner covers act as shield against elements and harsh weather

Air conditioner covers are made from the finest heavy-duty water repellent fabric materials like denier polyester to ensure the mint condition of your home cooling system by preventing it from being weather-beaten. So much for accumulated ice that will eventually melt and may “flood” and damage your unit’s inner components, snow water may also cause rust, wire deterioration, freezing of mechanism or worse, short circuit.

In addition, aircon covers deter other dirt elements and substances that may damage its metal casing, and even the inside mechanism once these damaging agents enter through the grills, such as tree branches, leaves, dust, eroded earth, even animal droppings. Quite nasty, right?

Cover it. But don’t leave it entirely there!

It is very important to take note of this. For one thing, your air conditioning unit releases heat accumulated by the compressor and condenser. This becomes an instant VIP access to rodents, insects and other animals lurking around the area to find warmth. What’s more, leaving the cover entirely could cause moisture to be trapped, and cause condensation which may also damage the internal components of the air conditioner.

To avoid such occurrence, just make it a point to take off the cover every once in a while, especially during daytime, and it’s not that snowy. During the summer, you may want to keep your covers for a while, as it won’t be any much of a need during this season. As a stand-in, you may instead put plywood on top of the unit during the day, and dress it by night time.  This will also allow the condenser and the compressor to “breathe”.

YES or NO?


The final verdict? Yes, it is still recommended to use a trusty cover to retain your air conditioning system’s cosmetics and overall working form, provided that owners have to take into consideration the status of the weather and the general condition of your location according to seasons. Moreover, they also need to know the right time and circumstance to strip off the unit from its cover.

Most aircon experts would probably dispute this, as they’ll say it is not really necessary to put a cover to your unit because the components are made from impervious materials. For us, we beg to disagree, because our bottomline is: It is in our best interest to protect and prolong the longevity of your air conditioning system. And these heavy-duty outdoor covers by Formosa guarantees total protection for your home and leisure investments to ensure convenience and carefree living.

Friday, October 31, 2014

Intimate Patio Dinner Ideas for Thanksgiving

Thanksgiving is just around the corner, and what better way to spend it with your significant other or family than to serve traditional home-cooked meal (don’t forget the turkey!) and have an intimate dinner with them… And as far as that rhetoric question can be answered, yes there’s a better way to spend Thanksgiving with your family, and that is to take off those patio furniture covers and set up an intimate patio dinner!

               Screengrab from Charlie M Schultz’ A Charlie Brown Thanksgiving
And because having a typical night of turkey and cranberry inside the house or in your favorite restaurant is becoming more of a routine rather than a celebration, here are some lovely-clever ideas to spruce and spice up your Thanksgiving dinner by the patio!

Dim Lights

When it comes to setting up a cozy, ecclectic and welcoming mood, nothing does it better than having a warm lighting. Tungsten lighting is always the perfect choice to harness this pleasant vibe. To do this, you can either set up the entire area with candles and lanterns or simply settle with those LED string lights available in the market. And to intensify the elating vibe your lighting, throw in some light trinkets and chimes to accommodate the breeze with beautiful noises.

Fire Up The Pit

Since the time of Thanksgiving usually falls on during those relatively cold days, might as well take off the fire pit covers for this particular night and spend the after-dinner by enjoying the comforting warmth given by glowing fire. Pair this with a nice bottle of wine, champagne or single malt while sharing stories with your loved ones. Heck, might as well go for the impromptu Thanksgiving S’mores party.

Under Your Umbrella

This time, instead devouring the whole roasted turkey and mashed potatos by yourselves, go for a more unique approach by going for a picnic-style Thanksgiving dinner. Lay a picnic blanket on the grass, carve some of freshly-roasted turkey, pour some cranberry sauce plus some veggies and roll it in a nice, warm pita or Panini bread and partner it with Mac & Cheese (that is if you’re a fan of Chandler Bing from Friends). Of course, don’t forget the wine for your toast. And adding detail to your captivating night by setting up an umbrella lounge by the backyard isn’t such a bad idea for an intimate dinner with your partner.

TENT-giving Dinner

               Setup a tent by the patio to celebrate Thanksgiving with your loved ones
No, don’t misinterpret the sub headliner. It’s a bad pun, please forgive us. Anyway, we just figured, since we’re talking about intimate dinners, why not go further by making it more “exclusive” by pitching your patio tent or screen house and set the table there. Make it even more romantic by matching it with the usual Miles Davis and John Coltrane music on the background. Better yet, hire a player if time and money permits. After all, you want it to be special, right?

On an end note, it doesn’t matter how you celebrate Thanksgiving with your loved-ones. Be it a simple, extravagant or extremely unique celebration, what is important is the essence of being thankful for the year’s worth of blessings, because that’s what it’s all about.

Friday, October 24, 2014

Is Your Firepit Ready for the Cold Season?

Cold season is fast approaching. And as early as today, some of us are already feeling the chilly weather. Perhaps, this is the perfect time to do some maintenance checkup and break-in your outdoor fireplace/fire pit for the coming days ahead.

So before getting all too excited about spending the nightfall in your patio, burning wood while downing a six-pack, here are some things you might want to consider doing to make sure your fire pit and/or outdoor fireplace is ready to be of service for the cold season.
‘tis the time of the year to ready your patio fire pit for the coming cold days
1. Clean off burnt residue from the fire pit – It is a given that fire pits (virtually all fire places) are prone to being dirty and/or blackened due to burnt materials and residue. That’s why it is important to clean it first before setting up your fuel and tinder. Make sure to scrape off creosote –a burnt wood byproduct that can produce burst of flame when re-ignited by fire – and other byproduct build-up that may cause potential fire risks. If you happen to use the pit for outdoor cooking as well, then it is advisable to include the cooking peripherals as well in your pit-cleaning checklist.

2. Check the fire pit for damages – A poorly-maintained fire place or a fire pit imposes potential dangers that could result to serious damages and accidents. Ergo, it is a-must to inspect the entire pit for damages such as cracked mortar and loose or gapped brick/stone for repair. Cement, lime putty or grout can be used to fix these imperfections.

This also goes with portable fire pits; metal-made pits are prone to rusting and corrosion, so it should be checked for deterioration. To repair this, you may use steel brush to remove the flakey stain patch. If some of the parts have been significantly disintegrated, you can patch this with a thin metal sheet and weld it to cover the rusting part.

3. Move your patio furniture – Just to be sure, move some of your patio furniture that may deemed prone to burnt damages in case a sudden spark of tinder lands on it. Instead, use wood chairs and tables to further avoid such accidents. To make it even safer for your precious outdoor furnishings, it is better to shield them from ashes and fumes using a trusty patio furniture cover.

4. Stockpile some fuel – And by fuel, we’re not just talking about gas or kerosene. It is basically the materials that you’ll be using to create and maintain fire. And that includes wood, coal, newspapers, briquette and of course, lighter and/or matches to start one. For those who are using wood, it is important that you should “season” the wood (dried out for 6 days). Go for hardwood like maple, hickory, oak and cherry instead of softwood, as the latter doesn’t last long.

5. Set up a safe spot for children and pets – Because your kids and beloved furry pets want to enjoy the outdoor warmth as well. That being said, you may set up a safe area –ideally a significant feet away from the fireplace – for them to stay. Place a nice, comfy outdoor mattress and a pet throw will do the job in keeping them warm and cozy.

6. Lastly, don’t forget the s’mores essentials – You’re sitting in front of the fireplace, right? So, what are you waiting for? Prepare the s’mores table and start the fire… because an outdoor fireplace wouldn’t be complete without enjoying a stick of roasted marshmallows and a piece of chocolate sandwiched between a pair of biscuits. Heck, might as well get the hotdogs too!

Thursday, October 16, 2014

Stuff That Can Damage Your Smartphone

At times, we tend to take little things for granted (meaning your iPhone, Samsung Galaxy and other smartphones), that it usually results to inadvertent negligence. This is the common cause of acquired scratches, dings and damages to your beloved devices. Yes, you might say, “Not even once in my entire life have I dropped my phone.” followed by “It is basically the extension of my life”.

Little did you know that there are still a lot of threats your device is facing on a day-to-day basis, most of which are barely noticeable, while some are the result of occasional carelessness. These are the stuff that can carry out unwanted damages to your smartphones.

Here are some of them:
 
Photo courtesy: octopocks via instagram
1. Water – Every mobile, smartphone and practically all electronic devices’ number 1 enemy. Be it precipitation, condensation or just pure clumsiness in the form of accidental spillage, it seems that there’s no way your phone is safe from this gadget misfortune. And the damage can be nasty. It can cause your phone to die instantaneously or to say the least, lose some of its functions. Luckily for some, there’s still hope.

What to do? – First and foremost, the right thing to do is to place it somewhere dry and where water is not present. Also, make sure to sleeve a resilient cellphone cover and avoid using or placing it under extreme conditions for a period of time (especially during snow season). Now, we can’t do anything about nature, so the perfect remedy is through nature as well. In the event you accidentally dropped your phone, say in a pool, you have to turn it off, wipe off excess water, detach SIM card and the battery as well (if necessary) then bury it in a tub of uncooked rice in an upright position for 24 hours.

2. Third-Party Cable
– What could go wrong? To answer that question, this cheap lightning cable alternative to iPhone’s exclusive charging and data transfer accessory tends to burn iPhone’s (particularly iPhone 5) component namely the U2 IC, which is responsible for the controlling of the charging of the battery. And the original lightning cable has a specified series of leads that regulates the voltage and the current. These leads are not present on those ripped-off cables, thus releasing excessive amount of voltage, causing the said component to burn.

What to do? – Well, the logical thing to do is to throw away those cheap cables and go for the genuine ones. Made For iPhone accessories such as the authentic lightning cable may be expensive. But as they say,” a good thing is never cheap. But a cheap thing is never good”.

3. Anything in your bag that goes along with your phone – This refers to keys, spare coins, trinkets, keychains, mostly caboodles. Most, if not all of these are the potential culprits for scratching and denting your phone everytime you put it casually in your bag.

What to do? – Aside from encasing your phone with a reliable cover, patching a screen protector onto the device’s screen is a great way to shield your phone’s precious gorilla glass. And in addition to this, the best way to prevent such damages from happening to your phone is to dedicate a specific spot/pocket in your bag for your mobile.

4. Pocket Stuff – Little did you know that pockets can do significant damage to your phone, in the form of those unnoticed debris that’s accumulating in your pants such as lint, sand, hair and other dirt particles. As famous author, Robert Fulghum would put it, “Cosmic Compost”. Still, it does a lot of damages to your phone. Not to mention, those  copper rivets attached on the pocket’s edges can screech your phone’s sleek housing.

What to do? – Same goes with one of those solutions in number 3. Insert protective plugs into the 3.5mm audio plug and USB port. And for some self-serving reason you feel the sense of mobile urgency that you have to bring your phone while calmly walking by the beach, then it is highly suggested to put your phone in a resealable plastic bag to protect it from sand and… you’ve guessed it, WATER! As for the lint, still remember where did you put that iPhone pin thing? If not, use toothpick or a paperclip to take off lint build-up inside the port.

5. Cases and Covers That Don’t Fit – Rule of thumb: “If it doesn’t fit, don’t force it.” Smartphone covers today are now built and made for a specific make and model of mobile device. Hence, it is not advisable to use an incompatible case or cover. Otherwise, it won’t do any good in terms of protecting your phone efficiently.

What to do? – If the label says iPhone covers, then it is solely dedicated for iPhones and iPhones only. That’s the way it has to be. Also, cases have certain materials, so if you want something that’s tough enough to be at par with your active lifestyle, go with the armor-type cases. If you’re the typical posh, easy-go-lucky type of person, get those leather-made covers.
 
Formosa iPhone 5 Wallet Clutch Wristlet Purse Dark Grey

Thursday, October 9, 2014

Cleaning and Maintaining Your Barbecue Grill The Right Way

For some, grilling is an all year ‘round affair, while for others, there’s no better time to have a barbecue party than spring. As for the people of Kansas City, October is the perfect season for smokin’ foods. Whatever the case may be, cleaning your grill should be a routine thing regardless if you’re a barbecue season purist or an enthusiastic charcoal chef. You wouldn’t want your grilled cheeseburger to taste like last year’s kebab (or was it fish?) now, would you? Not to mention, nothing is better with char-cooked bacteria.

Too gross? We know! That’s why this blog post is telling you to make it a point to clean your griller every after use. After all, they ain’t going to clean themselves, and grill covers are just there to cloak your trusty cooker up until the next sizzling sesh!
Photo courtesy: Universal
To keep your grill up and ready for the next skewer session, here’s a guide on how to clean and maintain your grill the right way.

Rule of thumb

The first thing to remember when deciding to clean the grill is to let it cool and allow the ember to subside for a while, but don’t let it die down completely. As for gas-operated and electric grills, preheat the barbecue machine by setting it to “CLEAN” mode or set it to a lower heat setting. It is better to clean barbecue grills when it is still warm as charred food residue and nasty grimes tends to stick on the grates and surface once cooled.
“Grill is still dirty, man!”
Photo courtesy: horrorcultfilms.co.uk
Next step is make sure to the gas tank is closed. For electric-powered grill, unplug the cooking device before you begin with the bbq-brushing-burden. Meanwhile, for charcoal cookers, you may place the used charcoal and ember in a large plastic bag to dispose it properly. Finally, prep up your cleaning paraphernalia including a stiff brush, sponge, clean cloth, soap, and warm/hot water.

Make it “Grate”

Photo courtesy: Alvimann via morguefile.com
Once you’re ready, start by detaching the grates from the cooking equipment. And so goes for the burners, plates, drip pan and flame tamers if necessary. Start by dousing the grate with hot water and soap to soften the accumulated grimes and food residues then scrub it using a steel-bristled brush. For stainless steel parts, use a stiff bristled brush instead or a sponge with a rough side for removing hardened oil stain and carbon accumulation. Furthermore, make sure to brush the underside, inside, wall surface corners and jets of the grill.

If possible, you may also detach the cast iron grill for electric grillers to scrape off sticky oil and food residue from the surface. Likewise with the tube burner for scrubbing carbon build up. Next step is to rub the brushed grimes with a clean cloth or a paper towel. Do this until the black stuff that’s coming off from the griller is totally wiped out. Reinstall the components of the barbeque grill then apply a generous amount of canola or vegetable oil onto the grill frame. This is to help evade rust accumulation especially for cast iron grills and charcoal grates. For treated grates, you may skip the oiling application, and dry it up instead.

Neat Inside and Out

For the outside, it is okay to use a clean cloth soaked in mild soap and warm water. If necessary, cleaning solutions and stainless polishers can be used as well to remove stubborn charcoal stains and stuck grease. After which, give it a finish by dry wiping the panels and surface of the grill.

Safety First… And Last

Formosa Covers BBQ Barbecue Grill Cover
Right before you store your barbecue grill, make sure to check the gas hose and the gauge. Do this by applying a stroke of soapy water onto the hose, if a certain area of the hose forms a bubble, then it’s an indication of leak in your hose. Replace this immediately as it can cause accidental fire and other hazardous accidents. In relation, it is also advisable to unfasten the hose from the gas tank if you think you won’t be using the griller for a long period of time.

And finally, drape it with a barbecue cover to protect and shield your grill against harmful elements such as rain, snow, excessive humidity and the likes. If you don’t have one, this is the right time to check out Formosa Covers array of barbecue grill covers!

Tuesday, September 30, 2014

Common Misconceptions About Using Smartphone Protective Accessories

Just when we thought everything is alright with our precious iPhone and Galaxy Phones, we tend to get even more careless at most times, especially when taking care of our devices.


Fortunately, the gratuity and abundance of cellphone covers and accessories as well as the manufacturer’s initiative to equip their product with scratch resistant materials and reinforced shell layers became a makeshift messiah of the digital age. But as resilient as these covers and protectors are to protect our communication devices, it still isn’t enough to leave the entirety of the phone’s condition solely to its durability features.

To specify, here are some of the most common bits and mistakes we often overlook in taking care of our smartphones.

1. Casings will cover all the bases

Two of the most prone to dirt are the phone’s charging port and the 3.5mm jack plug for the earphones. As common as it gets, these two outlets serve as vacuum gateways for dirt and lint that can usually be accumulated from your pants’ pocket. These dirt elements are basically the number one cause of charging malfunctions, connectivity problems and port damages.

The Right Thing To Do – You need a piece of paperclip, toothpick or a matchstick and clean cotton to scrape off dust that has been collected by the port. Never damp the cotton with any liquid solution, as it will only cause further damage to the phone. Once you have taken off the dust, cut a small piece of adhesive tape and attach it on the other end of the clip, with the sticky part being on the outside of the pin. Lightly roll the adhesive-top pin to take off any stubborn lint and cotton residue that you might have missed out. Although it is not much of a recommendation, it is still good to use one of those protective caps for the plug and port to cover them when not in use.

2. My phone is scratch-free, Thanks to my screen protector!

Indeed, screen protectors are your phone’s screen savers… Literally! But mind you, this does not entirely mean your mobile will become invincible to scratches or worse, cracks. Despite gearing your smartphone with the best scratch-resistant film over its gorilla glass display, putting it in your pocket along with your keys, coins and wallet with metal zippers may still likely to damage your device. Likewise with the shell that encases the phone.

The Right Thing To Do – Investing on a reliable screen protector is one thing. But just to be safe, make sure to allot a separate compartment for your mobile to avoid direct contact with your other stuff. In addition, armor it with a sturdy clutch-like casing to double your phone’s protection, especially the back side’s surface. Lastly, make it a point to clean the inner-surface of the casing from time to time.

3. The case will save my phone from drops

Imagine how worse could it get the moment you drop your phone straight into concrete oblivion. Albeit phone covers are equipped with cushions to absorb shocks after an accidental drop, it is still possible to acquire internal damage to your gadget, especially if gravity tends to magnetize the device from your hands on a regular basis.

The Right Thing To Do – The basic thing to do here is to hold your phone properly. Having a glossy-textured phone shell or a super-thin body is not reason enough to blame the manufacturer for constantly dropping your device. Remember, casings and screen protectors are there to add extra armor to your smartphone, not to entirely save it from the doom of your clumsiness and carelessness.

Thursday, September 25, 2014

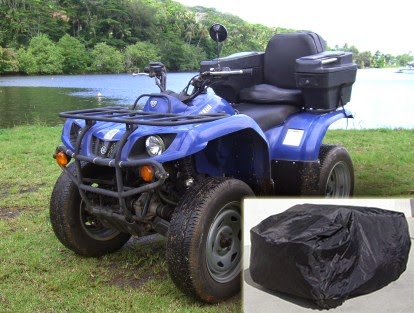
Is There A Need To Clean Your ATV?

ATV or All-Terrain Vehicle is designed specifically to withstand various field conditions and road abuse. But just because this vehicle is intended for hitting the dirt, it does not mean you should leave it as is after a whole day of rugged ride. “Leave it to the rain gods” attitude will only make your quad bike look unpleasant to drive on, not to mention could cause serious damages.

atv-covers-protect-quad-bike
ATV covers protect your recreational quad bike after a good cleaning


Why is it so important to clean your ATV on a regular basis? Because wrapping it casually with your quad cover won’t simply cut it! And because, like any other vehicles, dirt, grimes, scum and other impurities can cause unwanted blemishes, engine issues and rust problems to your precious road warrior.

So, to answer the question: Yes, there’s always the need to clean your ATV because it should be a part of your vehicle’s routine maintenance. So get up and gear up and time to give a well-deserved wash to your quad-bike and/or three-wheelers.

What Could Possibly Go Wrong If You Don’t Clean Your ATV?


A lot of things can go wrong once you developed a high disregard for vehicle maintenance (washing and cleaning for that matter). Just try to picture this: The build-up of dried mud and soil can cause rusting and erosion to your ATV’s components, engine, body kit, and other important parts. Also, the accumulation and spread of invasive plants like forest vines will greatly affect the performance of the buggy if not taken out immediately, as these plants may crawl and latch on to the chassis, fuel line, wires and axle. Not a good visual, don’t you agree?

A Good Ol’ Car Wash


To start, bathe your ATV from all sides preferably with warm water. This is to wash off loose mud, grass and weed that are stuck onto your quad. A power washer is also recommended for use in taking off stubborn mud residue onto the surface and hard to reach areas of the vehicle. Next step is to use mild shampoo or car soaps. Never use ordinary detergents or dishwashing liquid, as it may cause paint degradation. After which, rinse the ATV then dry it using a clean cloth or chamois leather. You may also use car wax and polishers, as well as a tire coating for dust protection and improved shininess.

Check The Hardware


Cleaning your ATV doesn’t stop at drying and polishing its surface. Needless to say, your engine needs a little cleaning as well. You can do this by checking your engine. A clean air filter is vital in maintaining your engine’s mint condition, as it serves as the engine’s screen to deter dirt, sand and other foreign particles that might get sucked in by your ride so make sure to keep it clean, or replace it if necessary. As for the under-chassis, it is important to inspect it regularly in case you’ve missed some hardened sludge during the wash. Moreover, make sure to maintain the water level of the radiator to prevent overheating. It is also important to cleanse the water reservoir by washing the dirt off using running water from the hose.

Lastly, once you’ll bath your ATV in and out, cloak it with your trusty vehicle sheet to maintain your ride’s sleek, clean condition even when not in use. Also, this will shield your wheels from potential dirt and damage accumulation overtime in case you won’t be using the ATV anytime soon.